30 October 2016

Flower arrangements for Christmas by Rens Korting, together with a pot-luck lunch, 25/10/16


Recently we've been holding our winter meetings at Françoise McCredie's charming residence in Cotignac. She is so welcoming. This was the first indoor meeting after the summer and normally we  start the season with a pot-luck lunch.  We were very lucky that this time we had Rens Korting devoting one day of her holidays to give several demonstrations of how to make an attractive flower arrangement for Christmas.


Françoise and Jean next to the greenery used in the arrangements

Unfortunately it was raining most of the day.  Our plans to hold the demonstration outside had to be changed at short notice. The kitchen was used and because of its large central work station it turned out to be ideal.

Some of the utensils used: a rope for a garland, a wreath, secateurs to cut the branches. etc.


Rens


Françoise had laid the table for the members.  Normally we take our own tableware, cutlery and glasses but this time they were all provided for.


We'd asked Tineke to make photos so that all our members could use the photos as examples.

The finished circular arrangement and the wreath

The first example was a circular arrangement, the same method can be used for a rectangular shape:

If you use 'Oasis' for the arrangement, you need a basin filled with water, you drop the 'Oasis' into the water and let it soak up the water till it is saturated.

The saucer with the prongs to hold the 'Oasis' 

The prongs are glued to the saucer with pieces of double sided tape

Melting the tape a little for a stronger adhesion

You place the 'Oasis' on the prongs. Cut off the edges to make the shape a bit more rounded. The first branches are pushed into each side of the 'Oasis'.

You finish of the basic structure with putting another branch on the top of the 'Oasis'. If you use a particular branch on one side, it looks nicer to do the same on all the sides.

Examples of greenery you can use i.e. branches of Ivy, multi-couloured ivy leaves with stalk, branches of different types of conifers, Pistachia lentiscus, Phillyrea angustifolia, in fact any evergreen shrub or tree growing in your garden or area. Cut a piece of the branch, and shape the end into a point.

The smallest size of wire should be used when attaching leaves to the arrangement

To use a leaf in the decoration you use the end of the wire as a needle, your thread it through either side of the central vein, you twist it round the stalk and the other bit of wire, you cut off the wire to the length required, then push it into the 'Oasis'.

Small fruit can be used by pushing it onto a wooden BBQ stick normally used for kebabs

Work in progress

To make a bow, it is easier to used wired ribbon, you fold it into the shape of a bow

You wrap a length of wire around the centre of the bow, then twist the 2 ends of wire together to be able to push it into the 'Oasis'

The second example was a wreath for a door.  There was not enough time to finish the wreath, Rens showed us the principles of how to go about it.

Wreaths are available nearer to Christmas at 'Gamme Vert'


To hide the straw of the wreath you cover it with green plastic. It comes in a roll.  If you cannot find it you can use dustbin bags cut into strips. When you come to the end, fasten it with a bit of insulating tape. You need about 3.5 metres of plastic wrap.

Next, make a hook to hang the wreath.  You use pliable wire on a spool to create the hook.  When you have finished making the hook, fasten a bit of string to the hook to find the hook later, after you have covered the wreath with greenery.


Make a small bouquet with different bits of greenery, then bind it together with the pliable wire.

Fasten the bouquet with pliable wire to the wreath

One bouquet on the outside, the next one on the inside, both at a bit of an angle fastened with the wire

An apple on a BBQ stick, just push it into the wreath

Another example of how to fasten the bouquets to the wreath

The finished wreath

How to make a garland:


You need a piece of rope, quite thick or otherwise like in this case you wire two bits of rope together. Make a large loop at the end to hang it on a hook or door handle.  A hanging garland is easier to work with.

Cover the rope with plastic, the same way as for the wreath

Make small bouquets the same way as was done for the wreath. Attach the bouquets to the rope with pliable wire on a spool just as was done for the wreath.
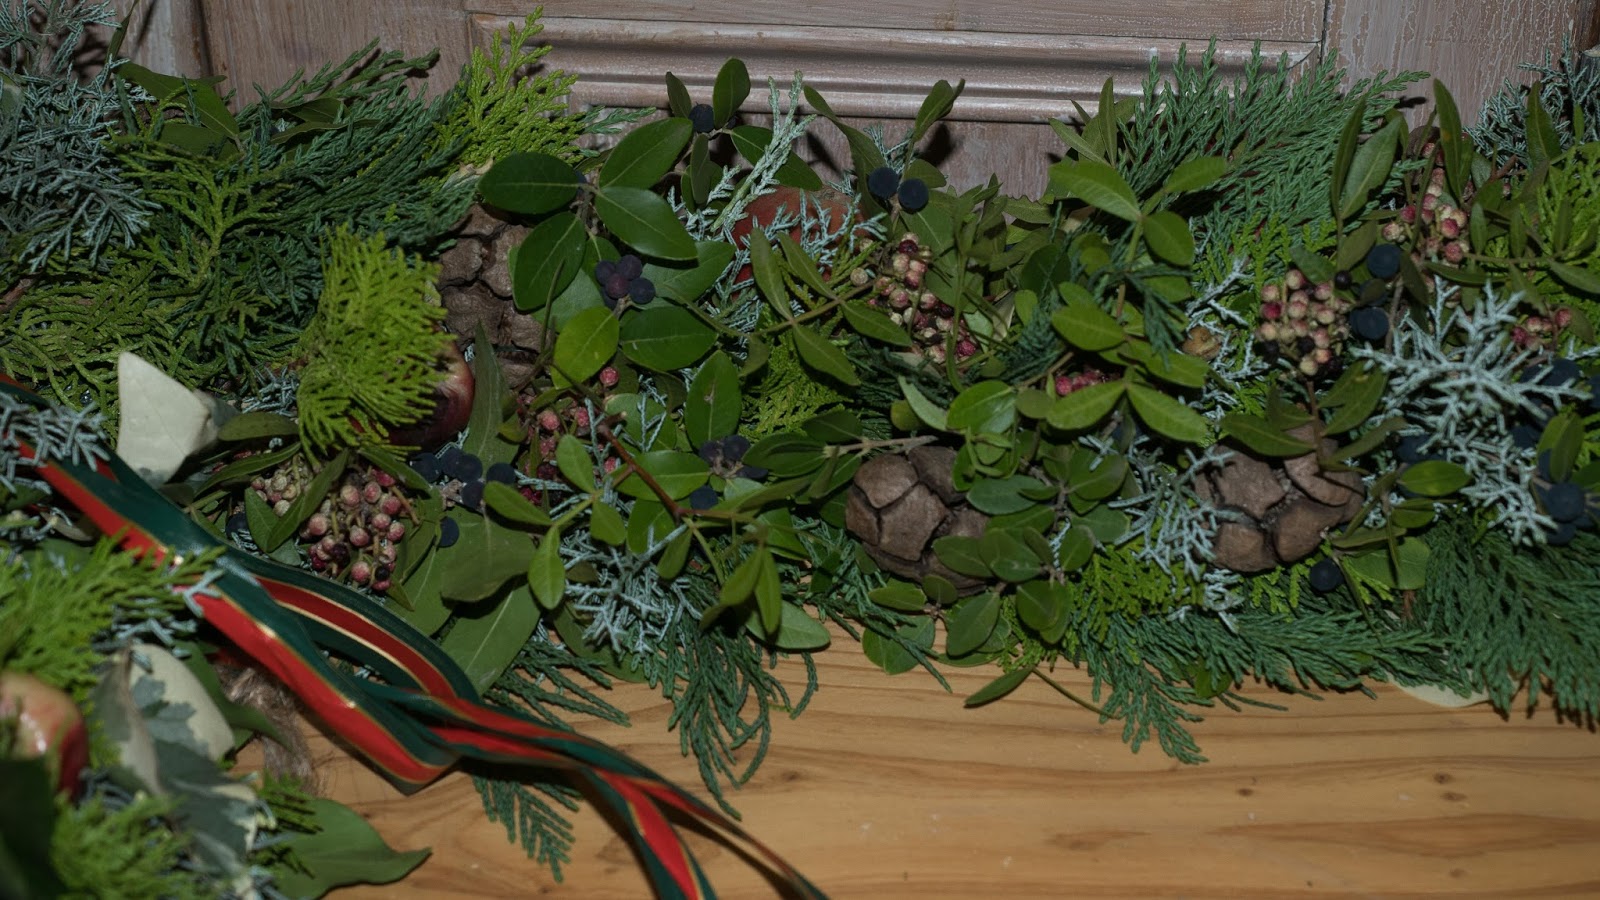
Finished garland

You may want to attach a double bow to the arrangement

Behind the normal bow, you form another loop

and another loop


you pinch the loops together, wrap the wire around the middle

Finished bow

Rens with our thank you present

At our next Garden Group Meeting on 29 November, I'll bring along some prongs to use for the round or rectangular arrangement, let me know if anyone is interested.

Photos:  Tineke Stoffels, a big thank you for the detailed photos.


07 October 2016

Garden group visit to the Luberon - private garden + Château Ansouis - 27/9/2016


The morning's visit was to a garden in the Luberon. The protect the identity of the owners and the position of the garden we are not able to name it nor where it was situated.

The actual house dates back to the 18th century. The garden was redesigned by Nicole de Vésian, the same person who designed the garden at 'La Louve' in Bonnieux, in 1990. It is larger than 'La Louve', roughly 1ha, which stretches beyond the back garden and spreads out over several terraces.

As you enter through the gate, the first impression you get is of lushness, everything is so green, this effect is created by the vines that cover every inch of the house. Yews clipped in an oblong shape in front of the wall, mark the edge to the street below.


Through an archway,  connecting the 2 parts of the house, you arrive in the back garden. This is the part of the garden that has some resemblance to 'La Louve'.


A pergola covered with a white flowering Wisteria and Parthenocissus quinquefolia (Virginia creeper) give shade to the patio near the house.

A large central bed with clipped evergreens in different heights and shapes draws the attention:


To create this image they've used the following shrubs:

Buxus sempervirens
Laurus nobilis
Ligustrum ionandrum
Lonicera nitida (poor man's buxus)
Pittosporum tibia
Viburnum tinus


The grey colour of clipped Teucrium fruticans is used to separate some of the terraces or to create special features:


After this very hot summer the deciduous trees were loosing their leaves. Beyond the clipped bed of evergreens a whole row of trees let the way towards the end of the garden, starting with two Acer negundo, originally from North America, with attractive variegated foliage. The leaves are quite different from other Acers.


After the Acer negundo a row of Tillia cordifolia 'Lime Trees' followed. Every year they are pruned into a square.
Tilia pruned into squares towards the far end of the path


The terraces are giving over to olive trees, espalier apple trees of various varieties, some Prunus dulcis (almonds), figs, Eriobotrya japonica (Japanese Loquat) and at the very end a small vineyard.


The vineyard on top of the wall

Lavender beds with olive trees in the background

The owners visit a few times a year, they have a full-time gardener to maintain the garden. Most of the shrubs are clipped 3-4 times a year, but the Buxus shrubs are clipped just once a year as they are slow growers.

The gardener who showed us around talking to Rini

Some other evergreen shrubs used in the garden suitable for clipping apart from the once mentioned above are:

Choisya ternata
Cotoneaster
Eleagnus ebbingei
Phillyrea angustifolia (narrow leaves)
Phillyrea latifolia (larger leaves)
Pittosporum tobira

A very green garden, no flowers when we were there, except for the Sternbergia bulbs. The clipped bushes give the garden its shape and formality, although a looser effect is created by the trees and fruit terraces.

Sternbergia lutea bulbs growing under the fig tree

After lunch in Lourmarin, we drove on to Ansouis to visit the Château Ansouis. Ansouis is a lovely village in the Luberon, dominated by the castle to be seen from far and wide.

Château Ansouis


Village of Ansouis with June in the background


The château was built in the 10th century as a military fortress to control the Aigues valley.  Just a few buildings, quite stark with military quarters for the soldiers and a prison.

Entrance gate to the château


Entrance to the château

From the 12th century onwards it belonged to different branches of the 'Sabran' family. The château was changed into elegant living quarters in the 17th and 18th century with additional buildings added to the old fortress.  You could say there two château in one. Within the castle there are several small gardens, one amazing parterre and in the largest garden there is a small hidden house built in the 18th century for private purposes, very unusual for this part of France.


Ansouis was ruled by the counts of Forcalquier and came into the possesion of the Sabran family in 1178 after the marriage of Raimon I to Garsende, sovereign countess of Forcalquier. From the 13th to the beginning of the 17th century the Sabran family were more or less in charge. It was then passed on to Sextius d'Escallis. In 1836 the Marquis Saqui de Sannes, descendant of Sextius d'Escallis sold back Château Ansouis to Elzéar Louis Zozine, Count of Sabran.  His descendants were in possession till 2008 and after some squabbling among the siblings it was sold in 2008 for 5.6 million euros to Gérard and Frédérique Rousset-Rouvière from Aix, who have totally restored the château to its former glory, taking into account the original features.


It was quite an undertaking and from what we saw it was a labour of love. They contracted artisans who were dedicated to their individual skills. Meticulous detail was given to fabrics, wallpaper, ornamental plasterwork (gypseries) and furniture.

Bassin at the bottom of the chateau

The owner showed us around the château.  We were not allowed to take any photos and it is hard to create a picture of the interior for the reader who was not there. The gypseries on a background of bluish/turquoise walls were exquisite.  There were scenes out of mythologie and history or just floral wreaths. The plaster to create the gypseries was deposited onto the walls and the artisan created the scenes by slowly chipping away at the plaster and in doing so creating the picture. The 'gypseries' are a special feature of the walls in the sitting areas. In the private bedrooms the walls were covered in either a wallpaper copied from the old remnants they found and especially recreated for the château or in fabric, printed with the same detail.  The curtains were beautiful, beige, with all sort of fruits and flowers.

The garden belonging to the château at the bottom of the hill overlooking the valley

For our members who did not have the opportunity to visit, we can highly recommend it, it is worth a visit.
All of us in front of château entrance except Gabrielle who took the photo.  Owner with light blue blouse.

Photo including Gabrielle


Photos: Gabrielle Wellesley and Isabel Pardoe


LinkWithin

Related Posts Plugin for WordPress, Blogger...